
Free Shipping
On Orders $49+
On Orders $49+


Looking to add a special touch to your Easter baskets this year? Making personalized Easter stuffies with Cricut Iron-on is a super easy and fun way to do just that! This project lets you turn adorable plush bunnies into unique, custom gifts that your kids will absolutely love. Even if you’re new to Cricut, this is a breeze to pull off - just a few simple steps and you’ll have cute, personalized bunnies ready for Easter morning.
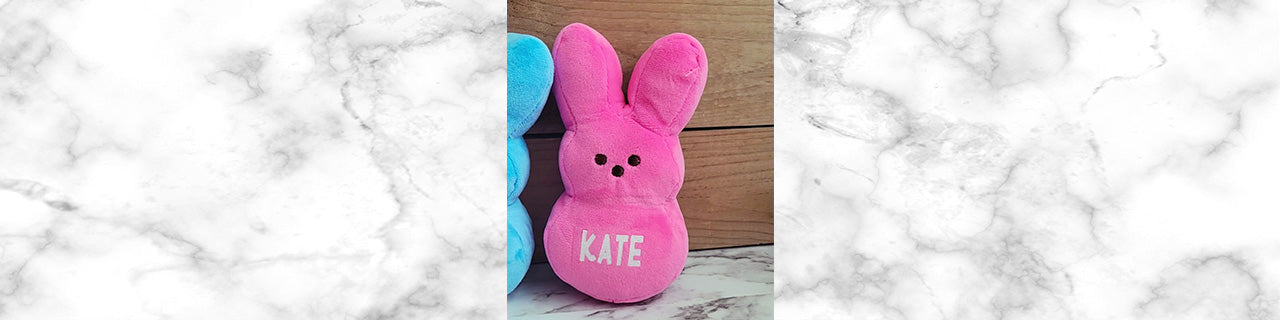
Grab (or create!) some Easter Peeps stuffed animals, like this adorable set available on Amazon. These 6 inch tall plush bunnies are perfect for adding a charming touch to kids' Easter baskets!

Open Cricut Design Space and add your kids' names to the canvas using your favorite cutting font. Adjust the size so the names fit perfectly on your stuffed animal. Then make the project, cutting the names from white iron-on.

Use your favorite weeding tools to carefully remove the excess iron-on material.

Preheat your Cricut EasyPress Mini to the medium setting. Position the weeded iron-on face down on the stuffed animal. Apply light pressure while you move the mini heat press over the iron-on for 25-30 seconds. Once it's cool to the touch, slowly peel away the carrier sheet.

The Cricut EasyPress Mini is a fantastic tool for tackling those tricky, hard-to-reach spots and unusual objects like shoes and stuffed animals. Here are some handy tips to make the most of this compact, versatile heat press:
Your EasyPress Mini has three heat settings - Low, Medium, and High. For delicate fabrics or heat-sensitive vinyl, go with Low. Medium works great for most fabrics and standard heat-transfer vinyl, while High is perfect for Infusible Ink projects and heavy-duty materials.
The Mini's precision tip is perfect for navigating around seams, buttons, and zippers. This feature allows you to get into those tight spots and ensure even heat transfer.
Unlike larger heat presses, the EasyPress Mini requires you to keep it moving. Use light, continuous pressure and glide the Mini over your design to avoid press marks and ensure even application.
To make sure your design transfers fully, let the heat plate extend about half an inch beyond the edges of your design. This ensures that all parts of your design receive adequate heat.
For the best results, keep your designs within the recommended size limits - up to 4x3.5 inches for iron-on vinyl and 2.75x 2.75 inches for Infusible Ink. If your design is larger, consider using a larger Cricut EasyPress.
And there you have it - your personalized Easter stuffies are all set and looking adorable! With just a bit of Cricut magic, you’ve turned simple plush bunnies into one-of-a-kind Easter surprises that your little ones will treasure. Enjoy the smiles and excitement as your kids find their custom bunnies in their Easter baskets, and revel in the joy of creating something truly special just for them!

Ready to get even more creative this Easter? Your Cricut machine can help you whip up a variety of delightful projects for kids. Here are some ideas to take your Easter crafting to the next level:
Create custom labels or designs for Easter baskets using Cricut Iron-on or Vinyl. Add names, monograms, or playful phrases to make each basket unique.

Use Cricut vinyl to create custom designs or patterns for your Easter eggs. You can even add some sparkle with foil or glitter vinyl to make your eggs stand out.

Design and iron on fun Easter-themed graphics or personalized names onto fabric bags. Think bunnies, chicks, or even “Easter Egg Hunt Champion” for an extra touch of festive flair!

Leave a comment