
Free Shipping
On Orders $49+
On Orders $49+

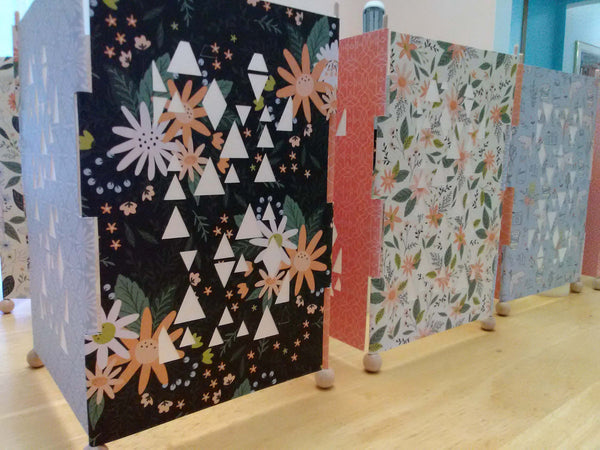
Are you hosting a party or special event and looking for an elegant and easy-to-make centerpiece? Look no further than these beautiful paper lanterns! Perfect for any occasion, from a birthday or graduation party to a wedding or anniversary celebration, these lanterns can be crafted using themed paper of your choice. And unlike flower arrangements, they can be made well ahead of time, freeing up your busy schedule on the day of the event.
To create these lanterns, you'll need just a few simple materials, including cardstock paper, wood dowels, wood beads, and glue. The process involves using a Cricut cutting machine to create a design for the lanterns, cutting out the pieces, assembling them around the dowels and beads, and adding a battery-operated light or candle inside. The end result is a stunning centerpiece that is sure to impress your guests. Check out this step-by-step guide to learn how to make your own paper lanterns, and browse other Cricut paper crafts on the blog for even more inspiration.
Add a rectangle to the Design Space canvas in the size that you’d like your finished lantern. My assembled lanterns are 8x5x5 inches, so my base rectangle is 8x5 inches. Add a second rectangle measuring 2 inches smaller on each side, or 6x3 inches. Center the 2 rectangles on each other and slice. Delete the center.

Now create the tabs that attach to the side of the base and wrap around the dowel rod to assemble the lantern. Figure the height of the tab by dividing your base height by 4 - in my case 8 divided by 4 is 2, so 2 inches will be the height of my tab. The width of the tab is determined by the diameter of the dowel rod. My rods are only 1/8 inch in diameter, so I sized the tab width at 1 inch. If you are using a larger dowel rod, increase the width of your tab accordingly.
Add 4 rectangle tabs in this size to the canvas. Position 2 tabs on either size of the base rectangle. Stagger the placement of the tabs as shown. If you imagine your base divided into 4 segments, place tabs on the left side at positions 2 and 4 and place tabs on the right side at positions 1 and 3.

Use the Position Tool in Design Space with its exact x and y position measures to butt your tabs right next to the base rectangle.

Weld.

If desired, choose a stencil design from Cricut Access to fill the empty center of the base and weld. I’m using Triangle Pattern #M7F3D323 for my project. Your final base should be one piece with cut out(s) in the center.

Make the project. Cut 4 base pieces for each lantern from heavy cardstock. If desired, cut 4 7x4 inch pieces of vellum to back the cut out for each lantern.

Wrap the tab around a dowel to determine placement and adhere the tab to the back of the base as shown.

If using vellum to cover the center of the lantern, adhere the vellum over center cut outs on the inside of the base.

Glue a bead at one end of each dowel and allow to dry.

Thread the dowel through the interlocking tabs to attach 2 sides of the lantern together.

Repeat for all 4 corners of the lantern.

If needed, trim excess dowel rod from the top of the lantern. Secure the dowel rod at the top of the lantern with a drop of glue.

Place battery-operated lights or a battery-operated candle inside to “light” the lantern. Never use the paper lantern with an open flame.


1) Garden Party Accessories Using Your Cricut
It’s a garden party! Cupcake wrappers, placemats, and custom floral containers are quick and easy with your Cricut. Use Natalie Malan Divine Peonies Deluxe Paper to set the color scheme for your next get together for a neatly coordinated look.
 2) Cricut Frozen Birthday Party DIY Paper Decorations
One of Elsa's, Anna's, Olaf's, Krisoff's and Sven's biggest fans just turned three! Sparkly paper will create delightful 3D Snowflakes and a birthday banner for your Frozen fan.
 3) Beginner Paper Gift Bag Decoration DIY Using Cricut
Create quick personalized decorated bags with any craft paper and Cricut design. Our team, working remotely during COVID-19 April 2020, separated like pieces of a puzzle. I made these appreciation bags, to let them know they are an important piece of the Craft-e-Corner puzzle.


Leave a comment