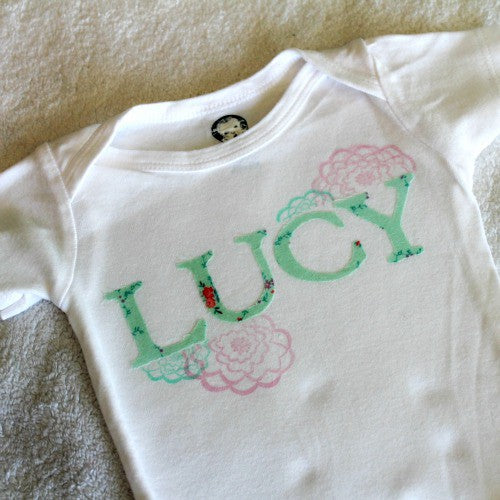
Hello everyone! Can you believe it is APRIL!? April showers bring. . .well, in my case baby showers. My sister is due in only two weeks so I thought I would make our little “Lucy” a sweet little spring onesie! Here’s a peek at the finished onsie!
To get my creative color wheels turning I usually turn to Pinterest. I looked up “spring color palette” and this beautiful inspiration board came up!
The light minty greens and bright vibrant pink combination was just perfect for a baby girl…and I had just the fabric!
For only $1.99 this beautiful light mint and vibrant pink vintage floral fabric was a steal! The fabric is a thin cotton material and super lightweight.
For this project we will be using Slice Fusible Web to adhere the fabric. Slice Fusible Web is a paper-like material that bonds to lightweight fabric in seconds to allow cutting with die cutting machines. The package comes with 4 12in x12in pieces of fusible web paper.
On one side of the fusible web sheet it will be smooth and flat. On the other it will look more like a web and have a fiber texture. You will want to iron this ‘webbed’ or textured side of the paper to the bottom of your fabric.
Again, with the webbing side down I ironed it to the back of my fabric. (In this picture it looks like the front of the fabric, but it’s not I assure you) I used high heat and some good pressure.
Here is a wonderful video tutorial on how to do this step! (above)
Once the webbing had fused to my fabric I cut off all the excess fabric from the edges and gave it one for iron-over on both sides.
The 12×12 sheet fit perfect onto my Cricut Cutting Mat and was ready for cutting!
(I used my 12×24 mat because it was newer and had more stick to it than my other mats, but in the end it was almost too sticky)
Using my Cricut Expression 2 Machine and the Plantin Schoolbook Cricut Cartridge, I cut out the letters to spell Lucy in all caps. The size of your cuts will depend on the project and your work space. In this case, it was a very tiny onesie so my letters were smaller. (1.5″)
I used a regular Cricut Blade but put my blade setting to a heavyweight paper and slowed the speed just a bit. It cut great the first try and peeled off nicely!
Once I got my letters off of my mat and back to my work space I took my iron and ironed them flat once more. This will ensure that the webbing has fused to the fabric. Lay the letters out and make sure they fit your space.
Once ready, peel off t backing of the letters and lay them exactly where you want them to be iron on to your project.
Next using the same heat and pressure, iron on your letters! For this part, you may want to use a book or something hard inside of your onesie or project as a flat and more stable ironing surface.
Once my letters were ironed on I took a step back and looked at my project. It was cute and turned out great, but needed something else…
To add that something extra special to the onesie, I decided to stamp some flowers using my Stazon Opaque Inks in Blush Pink & Mellow Mint. These inks are NOT typically recommended for fabric and do tend to fade when washed (depending on the fabric). Also, DO NOT DRY any fabric with this ink. I used a flower stamp from my Fancy Pants Summer Soiree Stamp Set. (as seen above)
I used masking tape to ‘mask’ off the very top and bottom edge of the letters and stamped a few flowers in opposite corners. Once dry, I carefully peeled off my tape holding my letters in place.
Once the tape was off and the ink was dry I ironed over the letters and the Ink once more. The heat will not hurt or effect the ink on the project as long as it has dried for a few minutes.
There you have it…my completed onesie for baby Lucy’s arrival! A few of you had questions to if the iron on fabric would wash well and stay on. To be honest, I do not know…yet. I would suggest washng the items inside out and really making sure you fuse the letters well to your project. Also, Stazon Inks are NOT typically recommended for fabric and do tend to fade when washed (depending on the fabric). Also, DO NOT DRY any fabric with this ink.
I do know that if you know how to sew, you could very easily add a quick stitching around the edges of the letters. A bright pink stitch would have looked great around my letters but my sewing machine is in hibernation at the moment :/
Hope you all liked the project and make sure to go pick up some Slice Fusible Web and try it out for yourself!
WHAT DO YOU THINK?
Comment below, I’d love to hear your thoughts!


Leave a comment