
Free Shipping
On Orders $49+
On Orders $49+

With the Cricut Mug Press and Infusible Ink, you can now create professional-quality, personalized mugs. The results are vibrant, peel-proof and even dishwasher safe. You can easily make mugs in minutes with simple, one-touch settings. Let us show you how!
Step One: Cut Your Infusible Ink

Cricut Mug Press works with Infusible Ink. You can use either Cricut Transfer Sheets or Infusible Ink Pens/Markers. You will create your design for your mug in Design Space and then cut or draw it using your Cricut. Infusible Ink works with any Cricut machine! The Infusible Ink will turn from a solid into a gas and infuse into your mug. It will become "one" with the mug, which is what creates the print. When you're finished cutting your Infusible Ink, weed your design.
Step Two: Apply your Design to the Mug

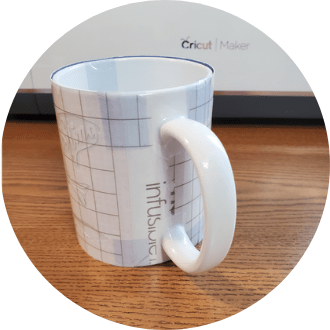
Next up, we are going to apply our design to the mug. It's important to make sure that the transfer sheet is applied smoothly onto the mug— you don't want any kinks or bubbles. You can use heat resistant tape to help with this! Also, make sure to leave at least a half inch from the handle on both sides.
We will preheat the mug press by plugging it in and pressing the power button, making sure the lid on the right-hand side of the mug press is open. When it is ready, it will beep, and the power button will be green.

Now we are going to place our mug in the mug press and close the lid on the right-hand side. We want to make sure the transfer sheet around the mug is fully covered by the mug press when it is closed.

Now we wait for the mug press to do its thing. It knows exactly how long to heat the mug. When it is done, the mug press will beep. We then open the lid and carefully remove the mug from the press, setting it onto an EasyPress Mat or a trivet to cool.

The hardest part is waiting for it to cool, but we don't want to burn ourselves. Once it is cool enough, it's time to remove the transfer sheet from the mug and see how our design turned out. This is my favorite part!
![]()
That's all there is to it. Making mugs with a Cricut Mug Press is so much fun!

I hope you decide to try your hand at making some mugs. You might just get hooked like me.
Courteney and Leslie
Personalized Mug Gift with the Cricut Mug Press
Cricut Mug Press Tutorial with Cricut Joy
Introducing the Cricut Mug Press
DIY Mousepads with Cricut Infusible Ink

Comments
Leave a comment