
Free Shipping
On Orders $49+
On Orders $49+

Slice is one of my favorite tools in Design Space! I use it all the time. If you don't know how to use slice yet, then you're in the right spot. It's super simple to learn! First we will walk through the basics of slice and then I'll show you how to slice an image with an image and then text with text.
What is the slice tool?
In a nutshell, slice allows you to cut one image out of another. The slice tool splits two overlapping images or text into different parts. Slice creates new cut paths from two images, resulting in three or more completely new shapes. Each of the new shapes will show up in the layers panel as an individual layer.
Tips & Tricks for Working with Slice:

The first thing we are going to do is add two images to our canvas. It's important to note that these need to be single-layered images. You can only slice two images at a time. A single-layer image will be one color. You can also see in the layers panel on the right-hand side of the canvas that there is just one layer for each design. Here's an example of a multi-layered image:

See how this design has multiple colors? In Design Space, this means there are multiple layers. You can also see in the layers panel that the colors are separated into their individual layers, so there are four layers to this design. Note: if you welded this image together (weld is another tool in Design Space) and made it a single layer, then you could slice it with another image. It's just important to know you need your images to be single-layered images in order to slice.
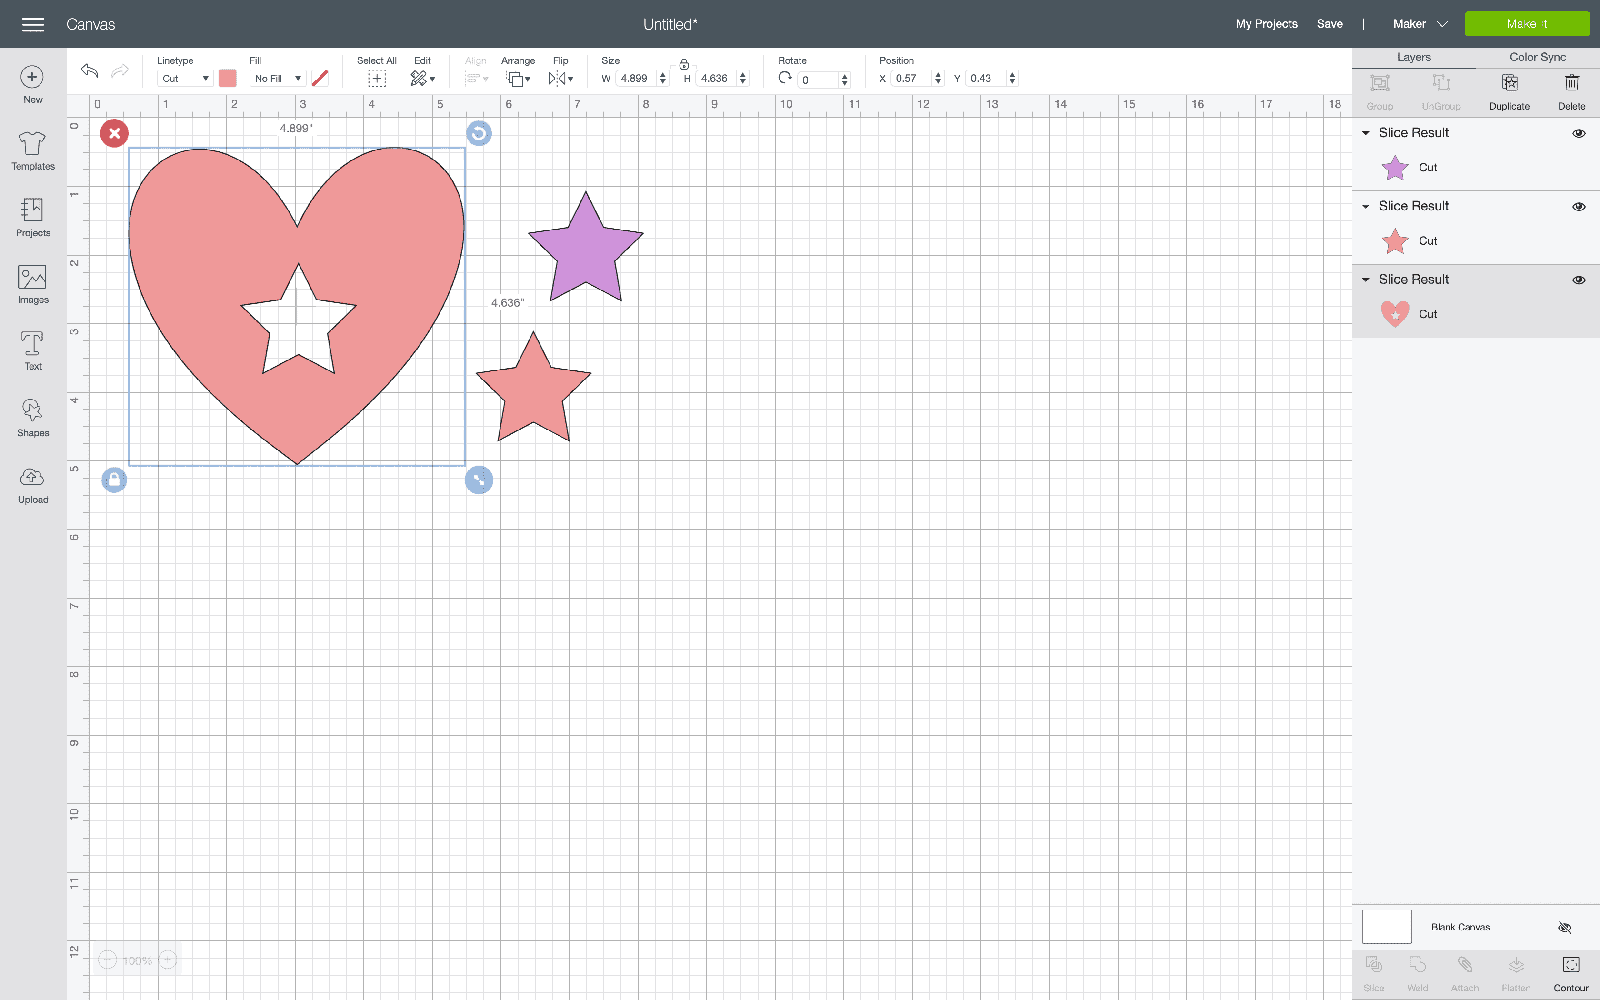
Alright, let's move forward! As you can see on the canvas, I added a heart and star onto it. I found these by clicking on "Shapes", where you can see the arrow point too (in the first image). You can also search for images by uploading your own or clicking on "Images" in the same panel and searching through all of the images there.

Now we are going to place our two images on top of each other. I put my star on top of the circle in the center. You can put your images anywhere— just put it where you want it to cut out!

Next, highlight both of your images! You can simply click and drag to highlight them both. You can also click on them one at a time while you're holding down command on your Mac or Shift on your Windows computer. A bounding box will appear around both images, and the individual layers will be highlighted in the Layers panel. Once two layers are selected, the Slice tool will become active.
If you're on a phone or tablet, select both images by tapping on the screen and dragging a selection box around both layers. Then tap on the Actions button at the bottom of the screen to see that the Slice option is available.
Now we slice! With both images select, click on slice in the bottom right-hand corner.

Once you hit the slice button, it will appear as if nothing has happened. However, start to drag the star away and you'll notice that there are now two stars (one for each layer *this only happens on a computer) and your heart with a cut-out star! You can see your three layers in the layer panel as well. You can either hide or delete the stars.
It's that simple! You can also do this with text too, it would look like this—


That's how easy it is to slice! It's a great tool to manipulate images and get the exact designs you're looking for. Happy making!
-Courteney
How to Make a Vinyl Stencil in Design Space

Comments
Leave a comment