Silhouette 101: How to Weld Plus DIY Baby Shower Invitation Inspiration (and free download!)
We are celebrating the old adage “April showers bring May flowers” with an April Showers Sale- Baby and Wedding showers that is! Now is the perfect time to grab goodies for your next celebration!
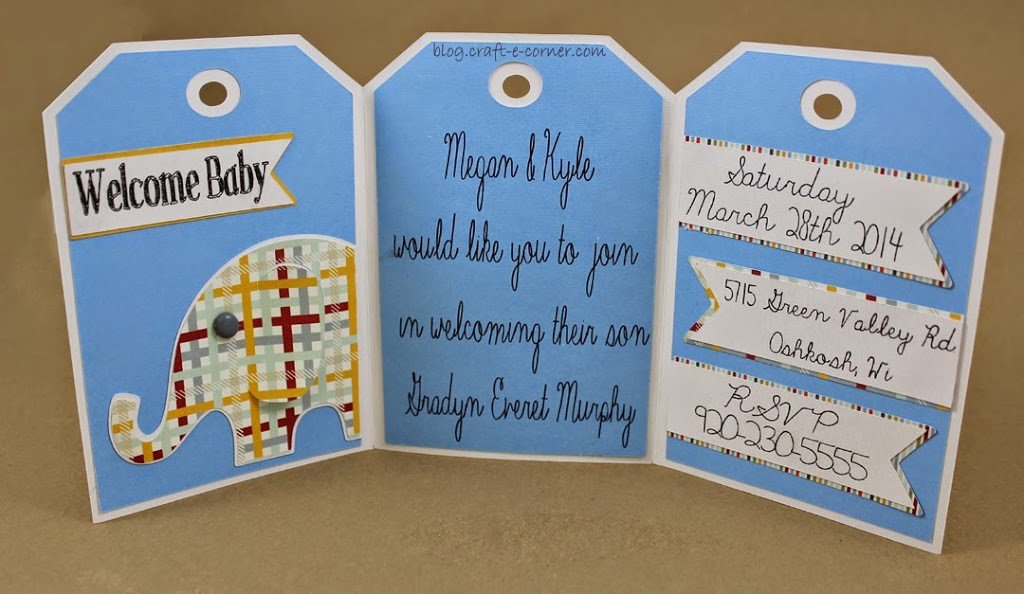
I made the card below for some baby shower invitation inspiration:

Now this was quite an involved card, too extensive for a real step by step tutorial, but I did want to show you how easy it is to weld using your Silhouette software. I welded three separate tags together to make this tri- fold card.
I will admit, I set out to make a SIMPLE card. I really did… but I have a problem keeping things simple sometimes and this card got very detailed, very quickly…
I love the resulting card, but could write a weeks worth of instructions on how to make it, so instead of going through all the nitty gritty details, I wanted to share with you how easy it was to make this card base using welding.
This process can be used to weld ANYTHING – letters, shapes, etc. For this card, I selected a tag shape.

I knew I wanted to make a tri-fold card so I took the tag shape and sized it so it would best fit on a 12″ piece of paper, but the folded card would be about the same size as a “normal” card (it ended up being a little thinner than a normal card, but will fit a standard envelope (great time to make your own envelopes - see a tutorial here).
TIP: To easily size your shape- click on the “scale window” button at the top of the screen then enter the dimensions you want the shape to be. This is a more precise way of sizing your image. I sized my tag to 3.75″ by 5.25″.
Once I had the tag the right size, I copied and pasted the it 3 times and made the sides of the tags JUST overlap. This is critical with welding- the shapes MUST overlap!

I wanted to weld those three tags together, but still needed the interior parts for the rest of the card, so I selected just the interior pieces of the tags and dragged those out of the way.

Next I selected all three empty tags on top then clicked the “Weld Button” (it looks like a square and a circle shape combined together).

Now you can cut the welded tag base and use a scoring board to score the lines. My favorite score board is the Martha Stewart Score Board. You now have a tri-fold card base!
I love the way this card turned out! One thing that I LOVE about a tri-fold card is that there is so much room to provide information and cute details!
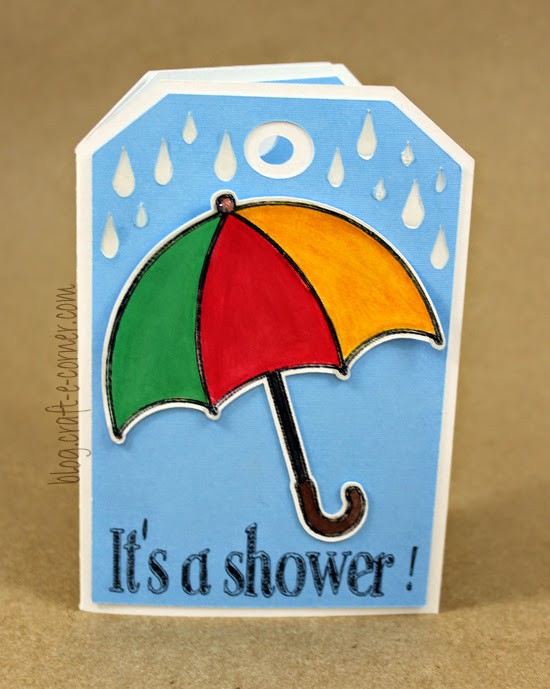
On the front of this card, I used my Silhouette Cameo with Silhouette Sketch Pens to sketch out the umbrella and the “It’s a shower!” I colored in the umbrella using watercolor colored pencils. Water color colored pencils combine the best of both coloring and water color, they make blending a breeze and I love using them for details on cards.

I used paper from an Echo Park paper stack for all the details. Using a paper stack for a card is great because all your paper will coordinate with very little effort on your part! I used a blue gray brad for the elephant’s eye here - it’s the little details that really bring this card together.

When you open up a tri-fold card, you have plenty of room for all the details. I used my Silhouette Sketch Pens to write out the details on the center tag and the banners. You can use the “print and cut” feature with the Cameo, but I will admit that my Mac and my printer do not always cooperate, so I haven’t tried this function yet (but Sketch Pens are my best friend because of this!).
My banners have the date, location and RSVP for the shower. You can include where the couple is registered, the name of the shower location or any other additional party details- there is plenty of room!
FEATURED SALES